If you're craving creamy and chunky chocolate bark with all the fillings you love and none of the weird filler ingredients in store-bought bark you don't, this homemade bark recipe is for you. 🙂

When I first saw brands selling various kinds of candy bark or snacking chocolate years back, I was definitely intrigued. It certainly seemed more wholesome than a candy bar or energy bar filled with highly processed ingredients. But I could never find one that I loved. Most seemed somewhat gritty and dry, perhaps from long shelf-life, and many had added ingredients that I'd much rather avoid.
So, I decided to try to make my own! Making chocolate bark is a LOT easier than you think, and with the amount that it makes, you'll have plenty on hand for whenever chocolate calls. For bonus points, you could even make your own homemade chocolate to use as the base for this bark. And for other classic and festive recipes with chocolate, try these classic small batch chocolate chip cookies, gluten free cookies, chocolate chocolate chip cookies or triple chocolate cookies.
Jump to:
❤️ Why you'll love this recipe
- Simple method for DIY chocolate bark
- Easy to customize with your favorite fillings
- No unwanted processed ingredients
- Festive holiday recipe
- Great for gifting or entertaining
🌿 Ingredients
The basic ingredient in chocolate bark is... (wait for it...) chocolate! I personally think dark is the best chocolate for bark, but if milk or white chocolate is more your style, go for it!
All of the other fillings are optional, and you can mix and match as you'd like. I love almonds with dried cranberries and sea salt, so that's what I'm using here. Feel free to use other kinds of dried fruit, nuts, peppermint candy, etc.

See recipe card below for exact quantities.
📝 Instructions

Step 1: Line a baking dish with parchment paper. Don't worry if the paper doesn't lay completely flat; just center a large piece over the dish and it'll flatten when you pour in the melted chocolate.
Pro tip: You can use any size dish or baking sheet you'd like as long as it has raised edges. To figure out how much chocolate to melt into bark, just lay the chocolate bars you're using into the dish so that they roughly fill that area.

Step 2: Chop any nuts or other fillings you'd like to add to your bark, and set all the fillings you'd like to use aside. Feel free to get as creative as you'd like with favorite add-ins!

Step 3: Break the bars into a few pieces, place all the chocolate in a double boiler with about an inch of water in the bottom of the boiler, and heat to medium heat.
Pro tip: If you don't have a double boiler, just place a stainless steel mixing bowl over a saucepan with an inch of water in it, and heat to medium.

Step 4: Continue to heat the chocolate slowly until it just melts, and use a silicone spatula to stir it while it's melting.

Step 3: Once it's fully melted, pour your chocolate into the lined dish and then sprinkle your fillings into it. Don't worry about arranging them evenly around the chocolate; some variation is what makes dessert bark so charming.
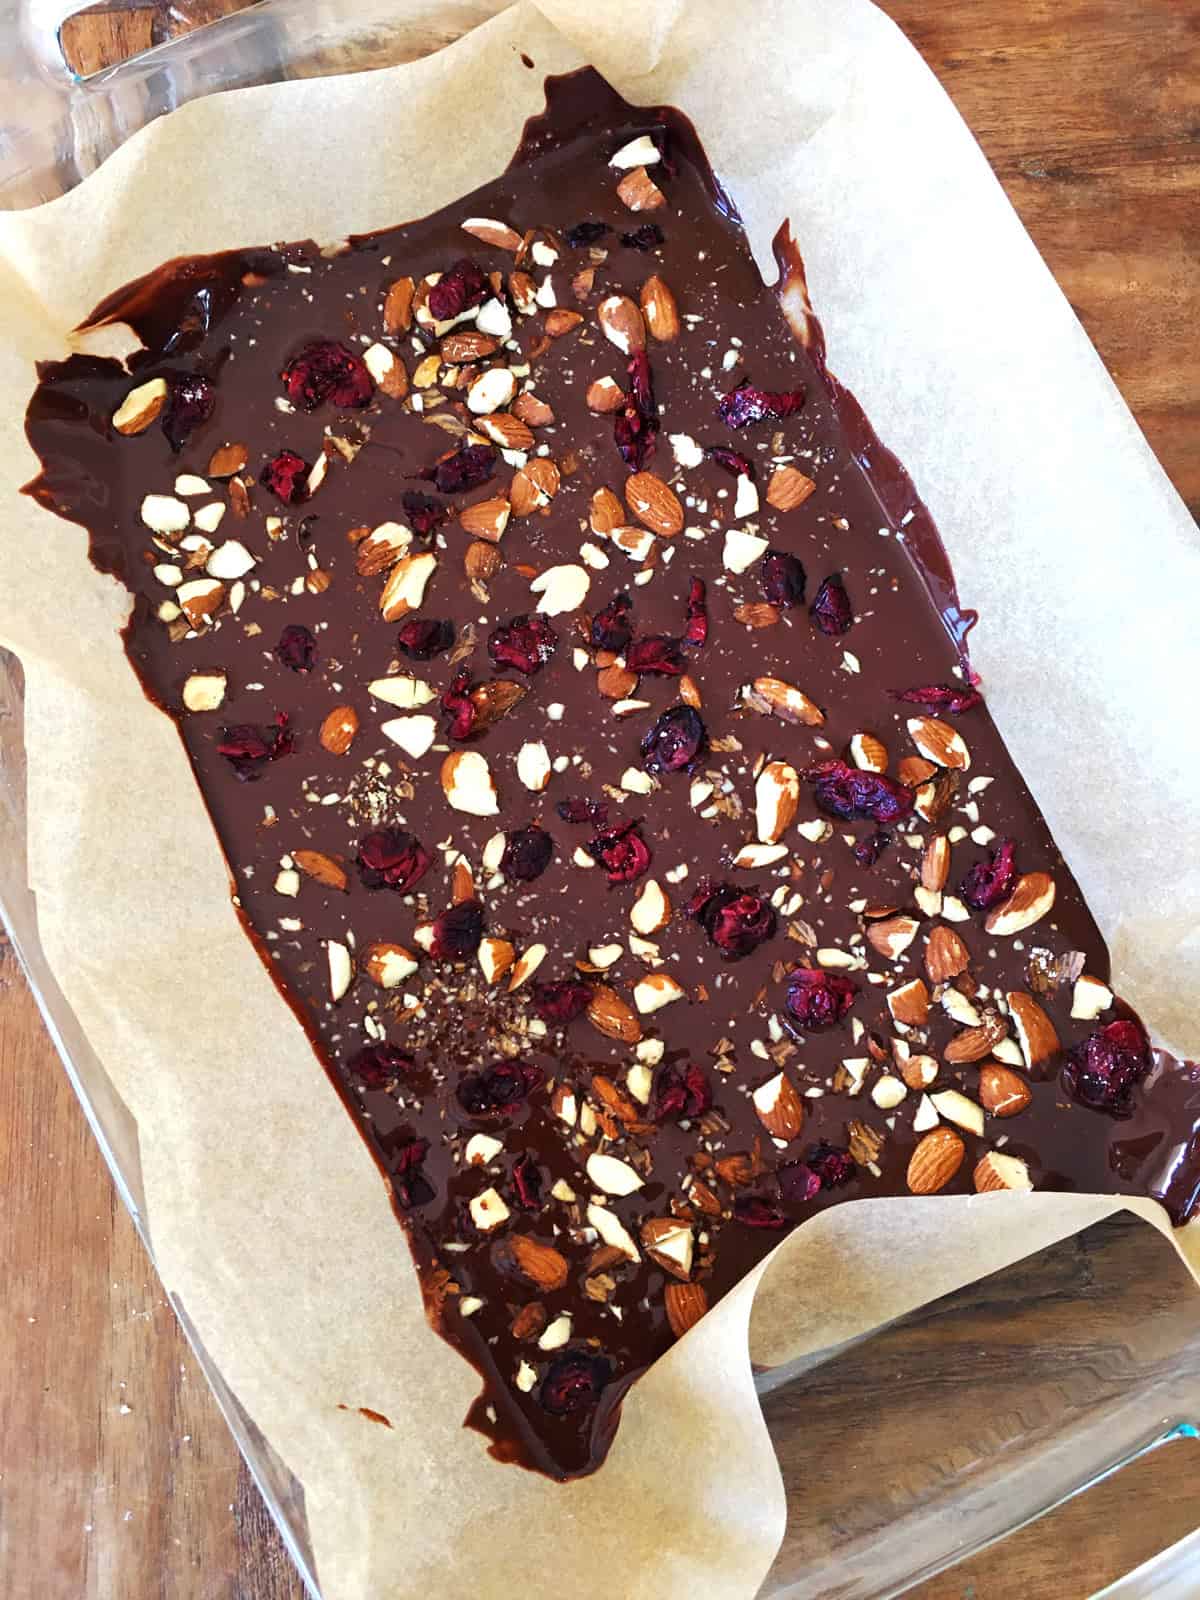
Step 4: When your bark is to your liking, place the baking dish in the fridge and chill for at least an hour to harden it. If it's thick with a lot of fillings, you may need to chill it for up to 2 hours.
Carefully remove the parchment paper and chocolate from the baking dish. Then, set it on a flat surface and use your hands to break it into as many pieces as you'd like.
📖 Variations
The sky is the limit with this recipe! Here are a few different chocolate bark ideas:
- White chocolate bark - use white chocolate for the base instead of dark or milk chocolate
- Peppermint bark - add chopped peppermint candies or candy canes to white or dark chocolate; this is a great holiday treat!
- Chocolate bark with nuts - add your favorite chopped raw or roasted nuts
- Chocolate bark with pretzels - add your favorite kind of pretzels (mini pretzels work well)
🔪 Equipment
Here is the basic equipment you'll need to make this recipe:
- 3-quart baking dish (or other sized dish)
- parchment paper
- double boiler (optional; you can also use a stainless steel bowl over a saucepan)
- cutting board
- chef's knife (for chopping any add-ins)
🍱 Storage
Chocolate bark will stay fresh in an airtight container in the fridge for up to 2 weeks. Or, freeze for up to 2 months and then thaw a bit before enjoying.
🎉 Top tip
There's no need to be exact with the placement of your fillings in the melted chocolate. The beauty of chocolate bark is in its imperfections. Oh, and don't worry if the melted chocolate lines the sides of the parchment paper as you pour it in. Those thin pieces will break right off and you might just be forced to eat them. 😉
Enjoy!
💭 FAQ
Plain dark chocolate or semi-sweet chocolate bars work well to make homemade chocolate bark, but milk chocolate or white chocolate could also be used.
The basic process to make homemade chocolate bark is to melt chocolate bars, pour the melted chocolate into a shallow dish and then sprinkle in fillings such as chopped nuts, dried fruit or peppermint candies.
Chocolate bark will stay fresh in an airtight container in the fridge for up to two weeks. It can also be frozen for up to two months and then thawed.
No; it's best to use dried fruit such as dried cranberries or raisins to make a chocolate bark recipe since fresh fruit has too much moisture and might make the bark fall apart.
🍳 Recipe

Homemade Dark Chocolate Bark
Ingredients
Equipment
Method
- Prep: Line a 3-quart baking dish with parchment paper. Chop any nuts or other fillings you'd like to add to your bark, and set all the fillings you'd like to use aside.
- Melt: Place the chocolate in a double boiler, add about an inch of water to the bottom of the boiler, and start warming the chocolate over medium heat. If you don't have a double boiler, just place a stainless steel mixing bowl over a saucepan with an inch of water in it over medium heat. Continue to heat the chocolate slowly until it just melts, and use a silicone spatula to stir it as it melts.
- Mold: Pour your chocolate into the lined baking dish and then sprinkle your fillings all around the chocolate.
- Chill: Place the baking dish in the fridge and chill for at least 90 minutes to harden (if it's thick with a lot of fillings, you may need to chill it up to 2 hours.)
- Enjoy: Carefully remove the parchment paper and chocolate from the baking dish, set on a flat surface, and then use your hands to break the bark into as many pieces as you'd like. Chocolate bark will stay fresh in an airtight container in the fridge for up to 2 weeks, or frozen for up to 2 months. Enjoy!


Leave a Reply