• Skip to primary navigation
  • Skip to main content
  • Skip to primary sidebar
One Happy Dish
  • Recipes
  • Fermented Foods
  • About
  • Contact
    • Facebook
    • Instagram
    • Pinterest
    • Twitter
menu icon
go to homepage
  • Recipes
  • Fermented Foods
  • About
  • Contact
    • Facebook
    • Instagram
    • Pinterest
    • Twitter
  • subscribe
    search icon
    Homepage link
    • Recipes
    • Fermented Foods
    • About
    • Contact
    • Facebook
    • Instagram
    • Pinterest
    • Twitter
  • ×
    Home » Recipes » Lunch » Mini Pizzas

    Mini Pizzas

    by Allison · Modified: Mar 7, 2023 · Published: Feb 14, 2022 · This post may contain affiliate links · Leave a Comment

    Jump to Recipe

    Looking for a recipe that the whole family can agree on? It's this one! Mini pizzas are easy, fun and 100% customizable. Just pick your favorite toppings. 🙂

    Three mini pizzas with various toppings on a white plate with a blue and tan plaid napkin.

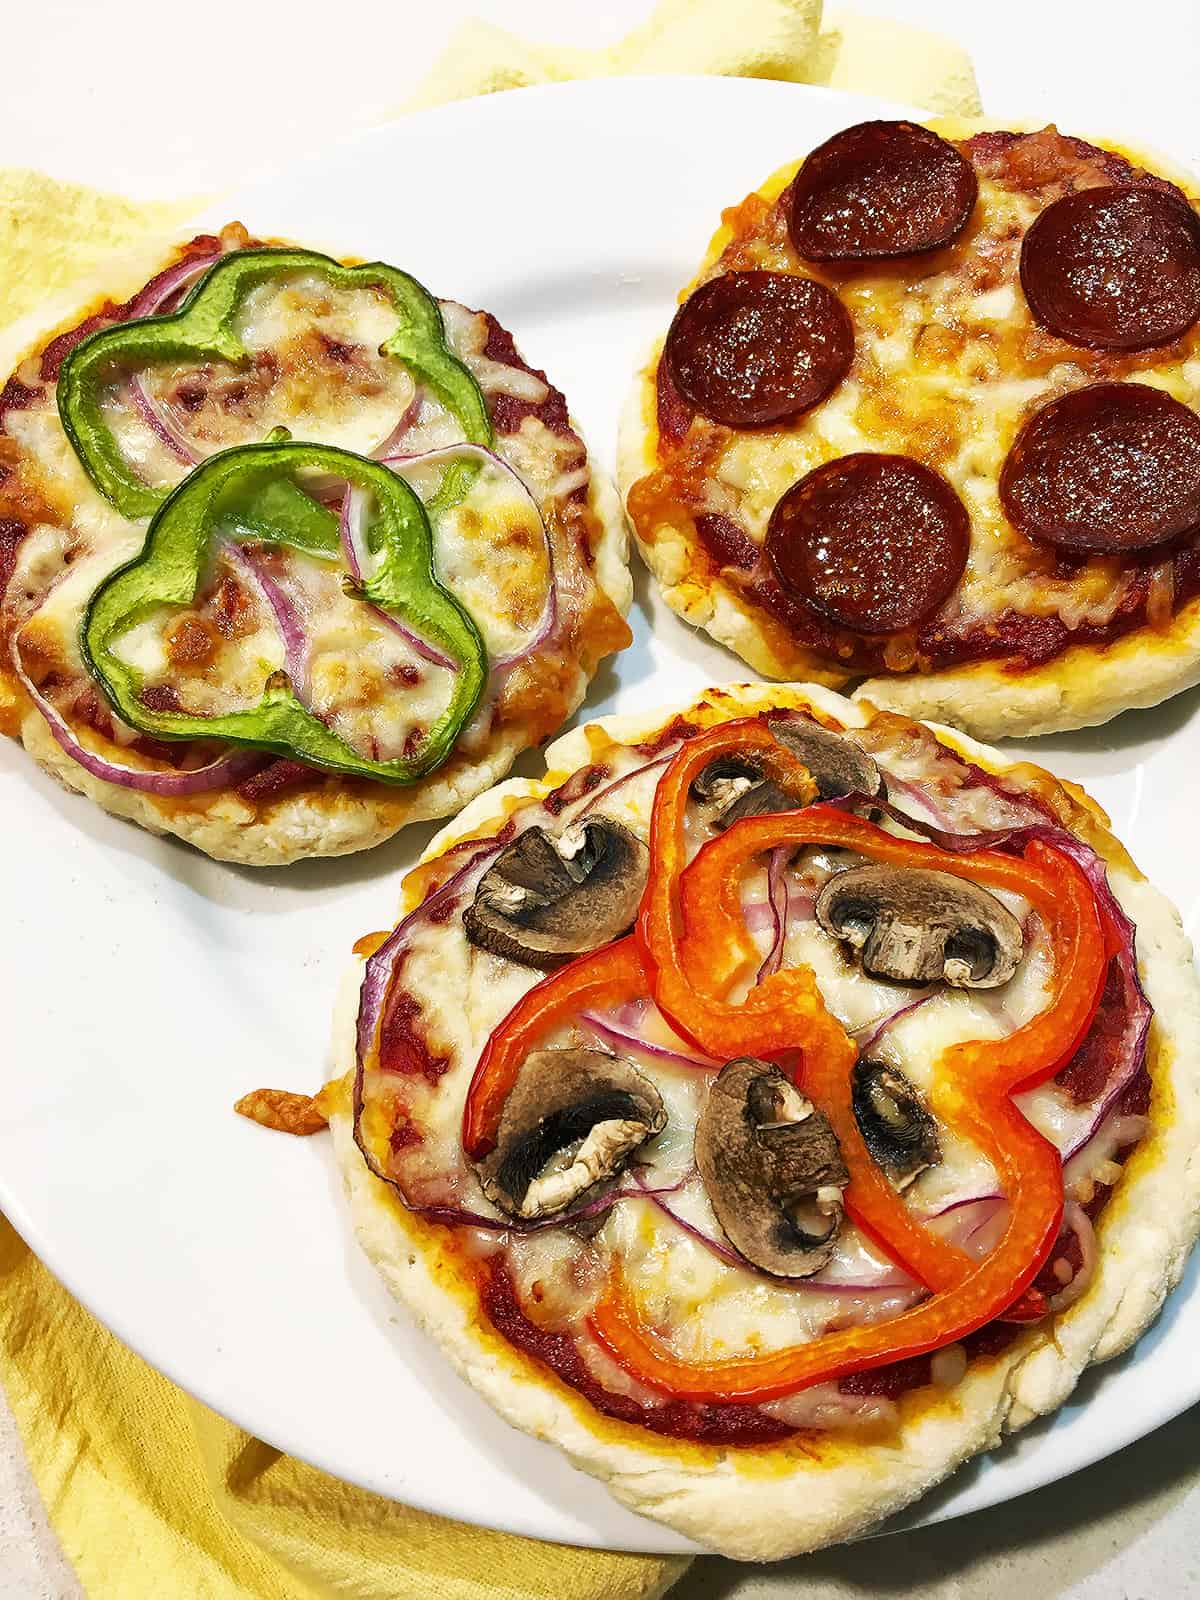
    I can never seem to have enough kid-friendly recipes on hand to keep things interesting and relatively healthy. And these mini pizzas are near the top of the list (hint: adults love them too.)

    I usually just use store-bought pizza dough and sauce for this recipe but if you like making everything from scratch, here are a couple of recipes for an easy homemade pizza dough and pizza sauce.

    If you're looking for other delicious family-friendly Italian recipes to make, these easy calzones or lasagna roll ups are super fun and also make great make-ahead meals. And this cherry tomato Caprese makes is the perfect little Italian appetizer.

    Jump to:
    • 🌿 Ingredients
    • 📝 Instructions
    • 📋 Substitutions
    • 🔪 Equipment
    • 🍱 Storage
    • 🎉 Top tip
    • 🍳 Recipe

    🌿 Ingredients

    You'll only need a few base ingredients to make mini pizzas, and the rest are completely optional; just pick the toppings you like best.
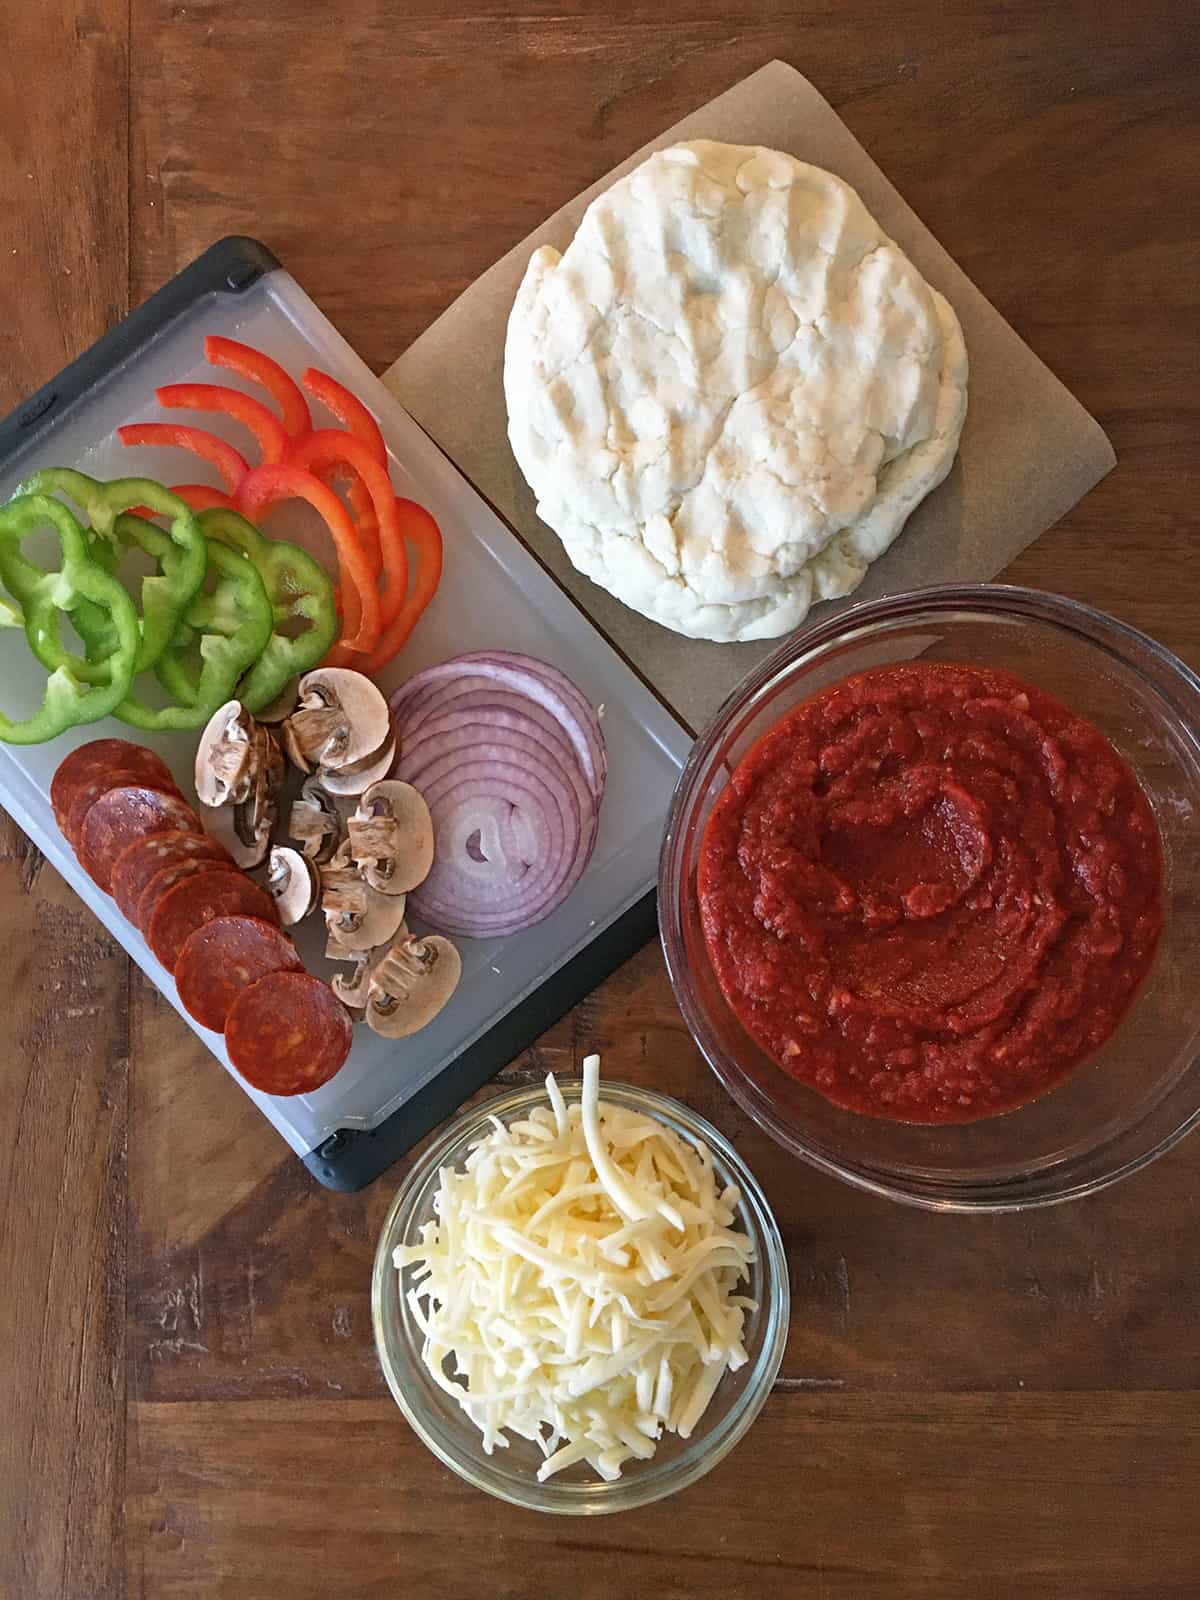
    Mini pizza ingredients in glass food prep bowls on a brown wood table
    • all-purpose flour
    • pizza dough
    • pizza sauce
    • shredded pizza blend cheese (or mozzarella)

    Optional toppings:

    • sliced pepperoni or sausage
    • sliced mushrooms, onions, or green pepper
    • diced pineapple

    See recipe card below for exact quantities.

    📝 Instructions

    First, preheat your oven to 425°F and line a baking sheet with parchment paper for easy cleanup.

    Then, coat a cutting board or large plate with a generous dusting of flour.

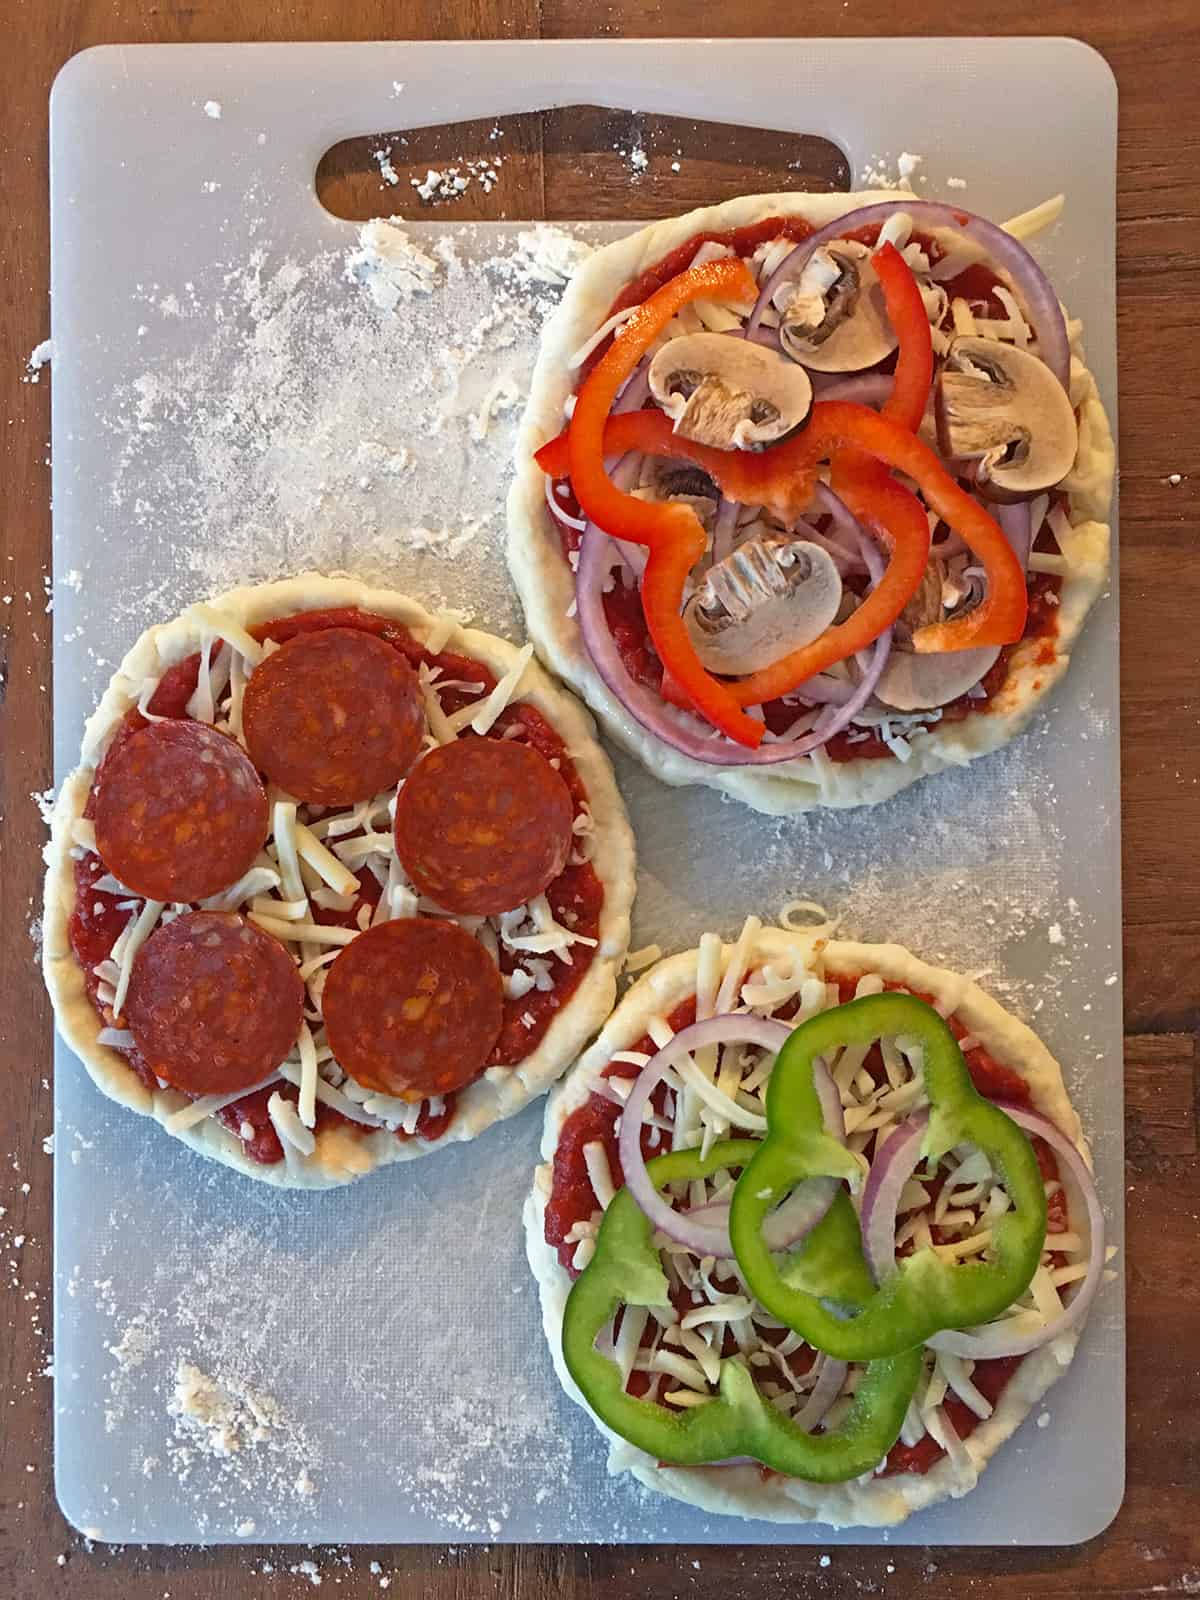
    Place the dough on the floured surface, turning once of twice to coat, and divide a batch of dough into four even sections. Using your hands or a rolling pin, press or roll each of the dough sections into a flat, circular shape no more than one centimeter thick.

    Pizza dough on a floured cutting board with a wooden rolling pin
    Rolling out dough for mini pizzas

    For each mini pizza, place about a quarter of the sauce in the middle of the dough and use the back of a spoon to spread it around the dough, almost to the edges, and then sprinkle with a quarter of the cheese plus any additional toppings desired.

    Four mini pizzas with various toppings assembled on a baking sheet lined with parchment paper
    Mini pizzas with a variety of toppings

    Place all of your pizzas onto the lined baking sheet and bake for 14-16 minutes or until the edges and toppings just start to turn golden brown.

    Let your pizzas cool for at least 10 minutes on the baking sheet before serving.

    📋 Substitutions

    Here are a couple of modifications to accommodate special diets:

    • Gluten free - use gluten free pizza dough mix to make gluten free dough; you can use the same mix as flour to sprinkle on your work surface, or just use any gluten free flour to dust
    • Dairy free - use any dairy free shredded cheese

    🔪 Equipment

    Just a few pieces of equipment are required for this recipe:

    • baking sheet
    • parchment paper (optional, but recommended for easy cleanup)
    • cutting board to flour and roll out the pizza dough (or just use a large plate)
    • rolling pin (optional, to roll the dough out quickly)

    🍱 Storage

    Leftover mini pizzas stay fresh in an airtight container in the fridge for up to 4 days or in the freezer for up to 2 months. They also make great make-ahead meals!

    🎉 Top tip

    You'll want to note that the cooking time largely depends on the thickness of your pizzas. If you're unsure if your pizza is done, cut through one and make sure the dough in the very middle is cooked through. If not, just cook for another couple of minutes and test it again.

    Enjoy!

    🍳 Recipe

    Three mini pizzas with various toppings on a white plate.

    Mini Pizzas

    What's better than pizza? Fully customizable mini pizzas! Choose your favorite pizza toppings from veggies to pepperoni, pineapple and more.
    5 from 1 rating
    Print Pin Rate SaveSaved!
    Course: Lunch
    Cuisine: Italian
    Prep Time: 15 minutes minutes
    Cook Time: 15 minutes minutes
    Cooling Time: 10 minutes minutes
    Total Time: 40 minutes minutes
    Servings: 4 mini pizzas
    Author: Allison

    Ingredients

    • 2 tablespoons all-purpose flour
    • 1 pound pizza dough
    • 1 cup pizza sauce
    • 1 cup shredded pizza blend cheese or shredded mozzarella

    Optional fillings (if desired):

    • sliced pepperoni or sausage
    • sliced mushrooms, onions, or green pepper
    • diced pineapple

    Instructions

    • Prep: Preheat the oven to 425°F. Line a baking sheet with parchment paper for easy cleanup. Coat a cutting board or large plate with a generous dusting of flour.
    • Roll: Place the dough on the floured surface, turning once of twice to coat, and divide the dough into four even sections. Using your hands or a rolling pin, press or roll each of the dough sections into a flat, circular shape no more than one centimeter thick.
    • Top: For each mini pizza, place a quarter of the sauce in the middle of the dough and use the back of a spoon to spread it around the dough almost to the edges, and then sprinkle with a quarter of the cheese plus any additional toppings desired.
    • Bake: Place all of the pizzas onto the lined baking sheet and bake for 14-16 minutes or until the edges and toppings just start to turn golden brown (see notes).
    • Enjoy: Let your pizzas cool for at least 10 minutes on the baking sheet, serve and enjoy! Leftover mini pizzas stay fresh in an airtight container in the fridge for up to 4 days or in the freezer for up to 2 months.

    Notes

    Cooking time: Note that cooking time largely depends on the thickness of your pizzas. If you're unsure if your pizza is done, cut through one and make sure the dough in the very middle is cooked through. If not, cook for another couple of minutes and test again.

    Nutrition

    Calories: 397kcal | Carbohydrates: 61g | Protein: 17g | Fat: 11g | Saturated Fat: 2g | Polyunsaturated Fat: 1g | Monounsaturated Fat: 0.03g | Cholesterol: 6mg | Sodium: 1163mg | Potassium: 186mg | Fiber: 3g | Sugar: 9g | Vitamin A: 265IU | Vitamin C: 4mg | Calcium: 65mg | Iron: 4mg
    Did you make this recipe?I'd love to know how it turned out! Please rate and leave a comment below, or share a picture on Instagram @onehappydish with the tag #onehappydish.

    More Lunch Recipes

    • Two halves of a Reuben sandwich stacked on a white serving plate.
      Classic Reuben Sandwich
    • Hummus and veggie wrap halves stacked on a white plate.
      Hummus and Veggie Wrap
    • Caprese chopped salad on a beige ceramic serving platter.
      Caprese Chopped Salad
    • Carrot ginger soup topped with microgreens in a white bowl.
      Carrot Ginger Soup with Miso
    • Facebook
    • X

    Stay updated

    Get new recipes via email.

    Reader Interactions

    5 from 1 vote (1 rating without comment)

    Leave a Reply Cancel reply

    Your email address will not be published. Required fields are marked *

    Recipe Rating


    Primary Sidebar

    Headshot of Allison Campbell, food blogger at One Happy Dish.

    Hi, I'm Allison! I love creating fresh, easy recipes with seasonal and fermented foods. Hello, jar of sauerkraut at the back of the fridge: I'm looking at you. ;)

    More about me →

    Banner with image of homemade Instant Pot yogurt.
    Banner with image of smoked salmon scrambled eggs.

    Footer

    ↑ back to top

    About this Food Blog

    • About

    Terms & Conditions

    • Privacy Policy

    Contact Us

    • Contact

    As an Amazon Associate I earn from qualifying purchases.
    Copyright © 2025 One Happy Dish. All rights reserved.

    Rate This Recipe

    Your vote:


    A rating is required
    A name is required
    An email is required

    Recipe Ratings without Comment

    Something went wrong. Please try again.